So when I upgraded to Lr3, I had to try the new noise-reduction, and frankly, was blown away. There are situations where the third-party plugins are better, but Lr3 is more than up to the task, as you’ll see in this post.
Note: Because Lightroom is non-destructive, and because noise-reduction algorithms tend to take some time to process, I find that Lr3 gets really, really fussy when you’ve turned the NR on beyond a few percent. Best to disable it if you’re doing other things, or you’re going to start tapping fingers on the desk really quickly. A few other features easily induce this behaviour as well (like distortion correction), so it’s not limited only to NR, but something I thought I’d pass on.
The Subject, and the Detail
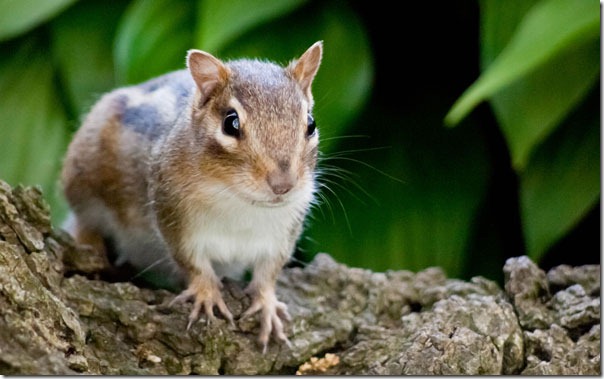
 So, a few weeks ago, I was out just doing a photowalk, and ran across this cute chipmunk on the root of a tree surrounded with some plants. The day was nice and bright, but the camera needed ISO 3200 at f/5.6, 1/250s at a 200mm focal length (400mm equivalent). I was using my Olympus Pen E-P1 which, while far better than a point-and-shoot, doesn’t fare quite as well as a dSLR with a larger sensor would fare, but still quite respectable.
Now, if I’d had faster glass, I could have avoided such a high ISO. I could also have tried to get away with a slower shutter speed, but I was pushing it as it was. So, ISO 3200 it is, and it’s a noisy image, as you can imagine. Lr2 couldn’t do anything with it, so to even get it out-the-door, I had to use a third-party plugin for my first publish on Flickr (View On Flickr). I still wasn’t happy with the result, but for now, that was it. I had other images to work on.
After Lightroom 3
 When evaluating Lr3’s noise-reduction, I wanted a subject that would really prove the NR’s worth. So I picked the same chipmunk. And with that, let the evaluation begin. The original image is above, and 100% crops from three different areas on the image are below. The final version is at the bottom of the post. Full-size downloads are available at the bottom of the post, as well, but beware – they’re huge!
Focusing on the Eye
The 100% crops below focus on the chipmunk’s left eye and include some of the whiskers and foliage as well. This gives a good view of how well detail is preserved as well as how the background is rendered. |  |
| Eye: 100%, Lr2 rendering, Default NR | Eye: 100%, Lr3 rendering, 37% Luminosity, 67% Detail, 50% Color |
 |  |
| Eye: 100%, Lr3 rendering, 67% Luminosity, 66% Detail, 50% Color | Eye: 100%, Lr3 rendering, 100% Luminosity, 66% Detail, 50% Color |
 | |
| Eye (Final): 100%, Lr3 Rendering, 32% Luminosity, 66% Detail, 54% Color |
Focusing on the Background
 |  |
| 100%, Lr2 rendering, Default NR | 100%, Lr3 rendering, 37% Luminosity, 67% Detail, 50% Color |
 |  |
| 100%, Lr3 rendering, 67% Luminosity, 66% Detail, 50% Color | 100%, Lr3 rendering, 100% Luminosity, 66% Detail, 50% Color |
 | |
| Final: 100%, Lr3 Rendering, 32% Luminosity, 66% Detail, 54% Color |
Focusing on the Fur
 |  |
| 100%, Lr2 rendering, Default NR | 100%, Lr3 rendering, 37% Luminosity, 67% Detail, 50% Color |
 |  |
| 100%, Lr3 rendering, 67% Luminosity, 66% Detail, 50% Color | 100%, Lr3 rendering, 100% Luminosity, 66% Detail, 50% Color |
 | |
| Final: 100%, Lr3 Rendering, 32% Luminosity, 66% Detail, 54% Color |
Final Version
 The final version ended up with 32% Luminosity NR, 66% Luminosity Detail, and 54% Color NR. Other settings were changed (white balance, etc.), but the other NR sliders were left to their defaults (0% Contrast; 50% Color Detail). These settings were picked because they seemed to render the most detail without looking overly fake.
 Having gone through this evaluation, I think Adobe has definitely improved the Lr3 noise-reduction, and my suspicion is that it would rank quite highly if placed along several third-party plugins. In fact, I prefer the final version above to the version on Flickr. Every photograph and situation is different, of course, but from this example, I quite like what I see.
That’s all for now; hopefully this post has been informative for all you Lightroom users. So, until next time, keep writing with light.
.jpg)
-2.jpg)
-3.jpg)
-4.jpg)
-5.jpg)
Very informative! Thanks!
ReplyDeleteMy experience matches yours, and I would rank LR3's NR as above the two third-party plugins that I own: NoiseNinja and Nik's Dfine.
ReplyDelete